Table of Contents
Pimax VR Settings
Overview
- Last updated 4/28/2024 -
It is April 2024, and I have decided to create this page to share my settings for my Pimax 8K X VR headset that gives me awesome looking graphics and 90 FPS in iRacing. But first, there is a LOT of misinformation out there. I've looked at different posts on different forums and on Reddit and there and some of it is garbage. I used to be a professional game developer (Bethesda Softworks, Rainbow Studios, THQ) working mainly with graphic engines so I should know what I am talking about when it comes to this stuff.
Even though these settings are what I use for my Pimax 8K X VR headset, these settings also apply to other Pimax headsets such as the 5K Super, Crystal (all versions including light and super), as well as the upcoming Reality 12K.
My Hardware
 My current PC consists of these hardware, and it's pretty high end. If your PC setup is not as high end as this, don't worry - there is a lot of headroom with my setup and options you can turn on and off to hit that sweet 90 FPS with your setup.
- ASUS ROG Maximus Z790 Hero mainboard
- Intel Core i9-13900K CPU
- MSI GeForce RTX 4090 Suprim Liquid X 24 GB
- G.SKILL Trident Z5 64GB DDR5-6400
- Pimax 8K X VR headset
The Setup
Unfortunately, Pimax headsets are not the easiest to configure and set up for the best possible experience. But if you follow these steps, I promise you that you will experience a night and day difference between the “default” settings and these settings.
Software Downloads
These are the software you need to download and install.
1) Download and install the latest version of the Pimax PC Client (also called Pimax Play)
2) Download and install the latest version of the Pimax OpenXR runtime
https://github.com/mbucchia/Pimax-OpenXR/releases
The file you want to download and install looks like PimaxXR-X.X.X.msi. This is the only file you need to download and install.
3) Download and install the latest version of the OpenXR Toolkit
https://github.com/mbucchia/OpenXR-Toolkit/releases
The file you want to download and install looks like OpenXR-Toolkit-X.X.X.msi. This is the only file you need to download and install.
Pimax PC Client Settings
These are the settings you want to use in the Pimax PC Client. I will explain the reasoning behind some of these settings.
Device Page
- Tracking mode = Lighthouse
- Light bar = Off
- Panel Mode = Native
- Refresh Rate = 90 Hz
- Backlight = 50

I turn my light bar off because it's purely cosmetic and generates heat. Definitely use Lighthouse tracking (with 2 lighthouse base stations) and keep your window blinds closed as the glass will confuse the tracking and introduce jitter (because of reflections).
Games Page
- Field Of View = Large or Normal
- Render Quality = Balanced
- Fixed Foveated Rendering = Aggressive
- Parallel Projection Compatibility Mode = Off
- Smart Smoothing = Off
- Lock to half framerate = Off
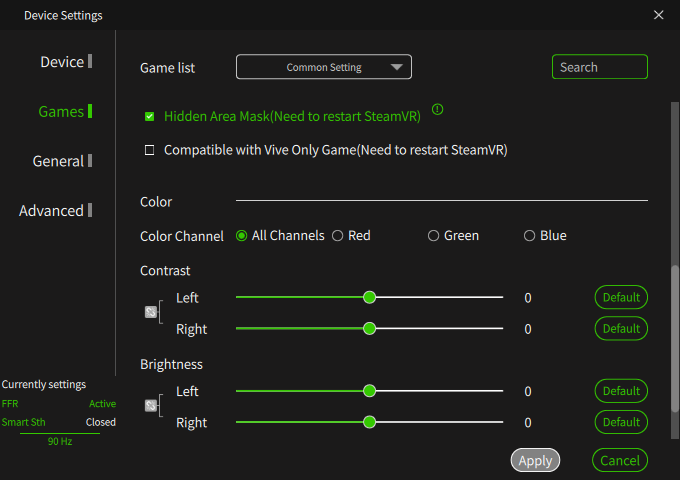
- Hidden Area Mask = ON
- Compatible with Vive Only Game = Off
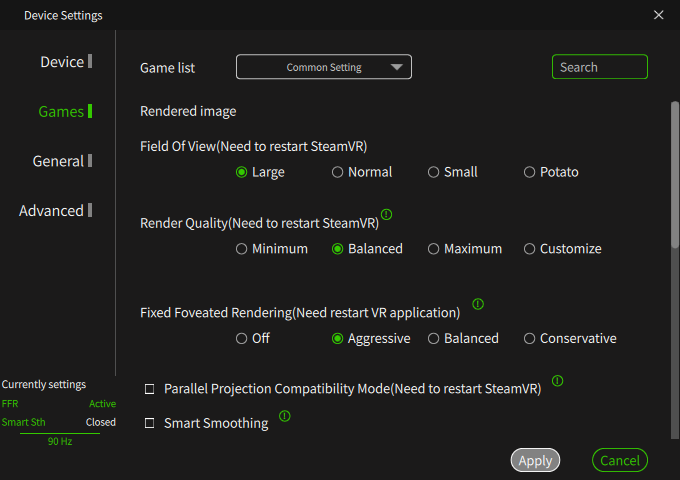
You will want to choose the Large field of view if you can hit 90 FPS with that. If you cannot, then choose the Normal field of view option.
For the Render Quality choose Balanced. You might be tempted to choose Maximum or Customize and slide the slider to the right. Do not do this - the “Balanced” render quality is actually the closest to the native panel resolution of your headset. Choosing “Maximum” or sliding the slider to the right in “Custom” is really introducing a form of super-sampling that is slow and inefficient. We will turn on super-sampling in a different way that is native to your graphics card and much more efficient later. Choose “balanced” here.
Setting FFR to “aggressive” would normally look bad, but combined with the hardware super-sampling that we will turn on later, it'll look just fine. For those of you with headsets supporting dynamic foveated rendering - turn that on instead, along with eye tracking!
Definitely don't turn on smart smoothing - it looks terrible in iRacing.
Turning on the hidden area mask prevents the game from rendering graphics where your eyes cannot see, boosting the frame rate.
Note - the FFR and hidden mask settings here might not actually do anything here, as they would be overridden by the OpenXR Toolkit settings later. I like to set them here as well anyway to be consistent.
Pimax OpenXR Settings
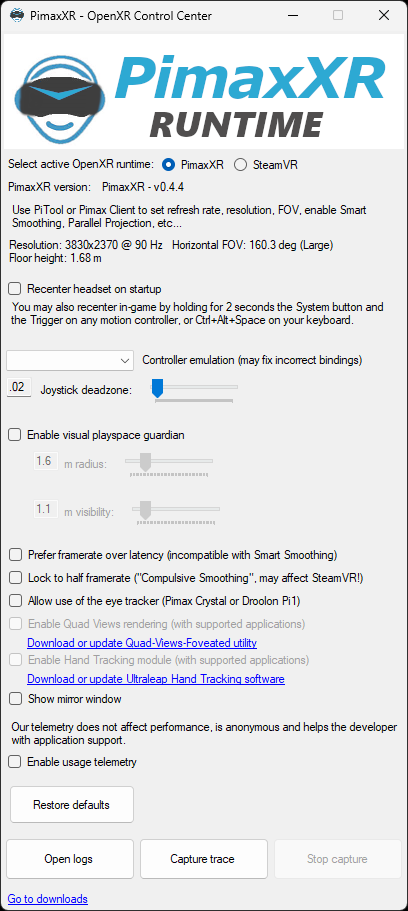 These are the settings you want to use in Pimax OpenXR. I will explain the reasoning behind some of these settings.
First, note that it says “Resolution: 3830×2370” in my screenshot. This is proof that selecting the “balanced” option for render quality setting chooses a resolution that is closest to the actual panel resolution (which is 3840×2160 for my headset).
- Prefer framerate over latency = Off
- Lock to half framerate = Off
- Allow use of the eye tracker = ON if you have it!
That's pretty much it for the settings for the Pimax OpenXR software.
OpenXR Toolkit Settings
There are really no settings to set here outside of iRacing simulator. All of the settings you want to set in the OpenXR toolkit will happen later, when we are actually running the iRacing simulator. What you do want to set up here are the “On-screen menu hotkeys” so you can actually bring up the OpenXR toolkit settings in-game. I just have mine mapped to the arrow keys on the keyboard so I can find them by feel without taking the headset off.
Now we are ready to move on to the settings within the iRacing simulator itself!
iRacing Simulator
 Launch the iRacing UI and join a random practice session or start up a test drive session. Make sure you use the OpenXR display mode. You should not be using the OpenVR display mode because unfortunately it does not have some of the features we need (such as foveated rendering) that is critical to hitting 90 FPS.
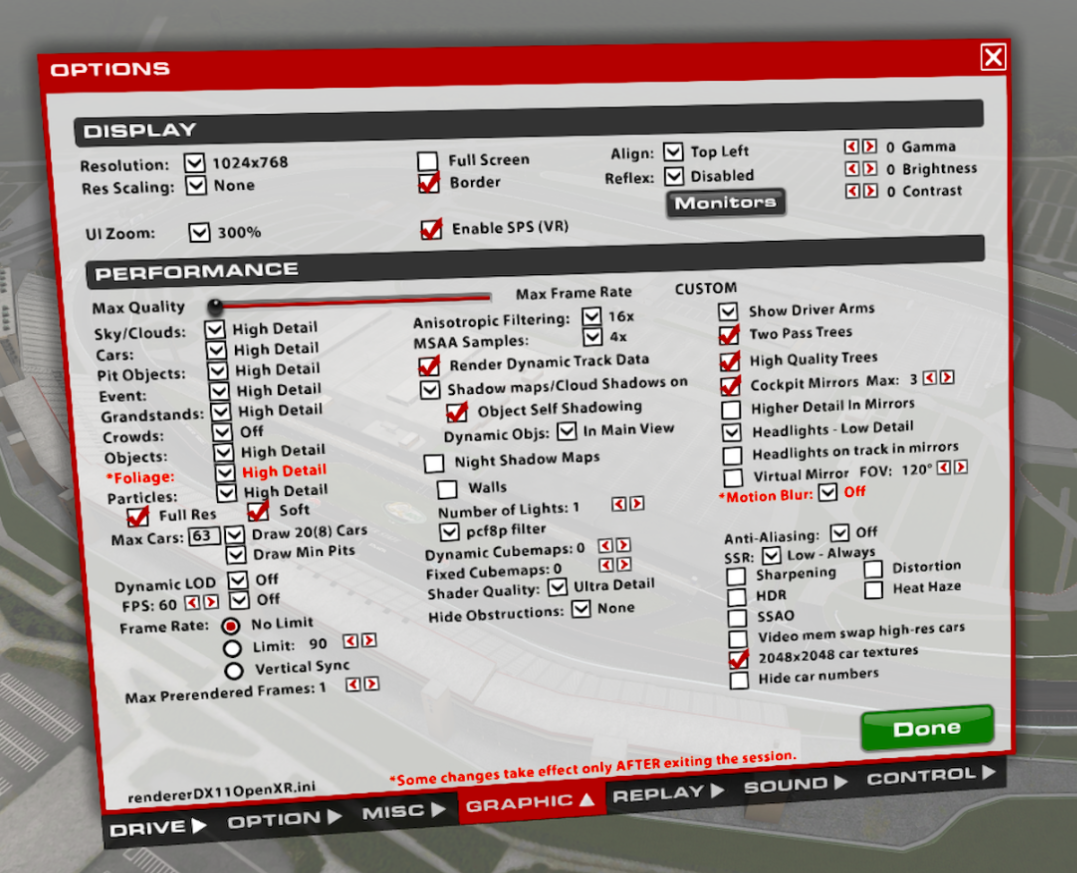
Once you are in the game, head on over to the graphics settings. These are the settings I have set up for myself.
- Resolution = 1024×768
- Res Scaling = None
- Align = Top Left
- Enable SPS (VR) = ON
Setting the resolution to 1024×768 is important because iRacing scales all of the UI graphics based off of this resolution. I also have it aligned to the top left corner of the screen so I can easily find the game window blindly with my trackball without taking my VR headset off. I do recommend using a trackball with a VR headset - the trackball never moves position and I can easily find it without taking my headset off.
Sky/Clouds, Cars, Pit Objects, Event, Grandstands, Objects, Foliage, Particles are all set to “high detail”. The only thing in this area that I have switched off are “Crowds”. When racing, you don't really notice them anyway, and they do take up significant render time, especially when passing the start/finish line on oval tracks.
For particles you should also turn on the “full res” and “soft” options as well.
Set max cars to 63 and also select “draw 20(8) cars” and “draw min pits”. That's plenty of cars to see on screen in front of you (20) with 8 cars in the rear view mirror. There is no need for more than this when racing. As for the rest of the settings -
- Dynamic World LOD = Off
- Dynamic Cars LOD = Off
- Frame Rate = No Limit
- Max Prerendered Frames = 1
I have the dynamic LOD turned off, and my reasoning for this is that if you can hit 90 FPS, then there is no need for it, so why spend the CPU time calculating LOD. The frame rate should be set to “no limit” to allow your VR headset to control how often the frame refreshes - it'll be naturally capped at 90 FPS - artificially capping it in the game as this could lead to jitter.
- Anisotropic Filtering = 16x
- MSAA Samples = 4x
Remember earlier I was talking about using native hardware antialiasing? This is it. Setting MSAA samples to 4x produces wonderful antialiasing (no jaggies) and I can still easily maintain 90+FPS on my rig. This form of antialiasing is done by your graphics hardware and is the only true antialiasing method. All other forms of antialiasing (the options you find in the lower right corner of the graphics options settings) are fake software based antialiasing that's pretty much garbage.
- Render Dynamic Track Data = ON
- Shadow maps/Cloud Shadows = ON
- Object Self Shadowing = ON
- Dynamic Objs = In Main View
- Night Shadow Maps = Off (Walls = Off too)
The reason I have night shadow maps off is because iRacing does this pretty poorly and there are serious / weird artifacts when you have this enabled. I prefer to have this off so I have a cleaner screen that doesn't have these distracting weird artifacts.
- Number of Lights = 3
- Shadows = pcf8p filter
- Dynamic Cubemaps = 0
- Fixed Cubemaps = 0
- Shader Quality = Ultra Detail
- Hide Obstructions = None
The PCF8P filter is just a method of generating soft shadows. I cannot see a difference between 16 taps and 8 taps.
It's important that you have the dynamic and fixed cube maps set to 0. They are ridiculously expensive to generate and contribute very little to the quality of the image.
- Show Driver Arms = ON
- Two Pass Trees = Off
- High Quality Trees = Off
- Headlights = Low Detail
- Headlights on track in mirrors = Off
Below are the settings to choose when you want to use the virtual mirror.
- Cockpit Mirrors = Off
- Higher Detail In Mirrors = Off
- Virtual Mirror = ON (120 degrees)
Using the cockpit mirrors instead of the virtual mirror adds roughly about 0.5 to 1 ms to the render time (out of the 11.1 ms render time budget for 90 FPS). If you do want to use cockpit mirrors then use these settings below instead.
- Cockpit Mirrors = Max: 3
- Higher Detail In Mirrors = Off
- Virtual Mirror = Off
And now the rest of the settings mostly have to do with post-processing. Most of these will be off.
- Motion Blur = Off
- Antialiasing = Off
- SSR = Low - Rain Only
- Sharpening = Off
- Distortion = Off
- HDR = Off
- Heat Haze = Off
- SSAO = Off
- Video mem swap high-res cars = Off
- 2048×2048 car textures = ON
This fake software based post-processed antialiasing method should be always off. Sharpening definitely should be set to off as that is the opposite of antialiasing - it makes aliasing worse. The other effects such as distortion and heat haze are so unimportant to racing that you should have them off. If you have a decent video card with plenty of video memory you should have the swap high-res cars option turned off to increase performance. However if you have an older card with less video memory you might have to turn this on.
Now, after making all of these changes to the graphic settings, click on the done button and you MUST quit the iRacing simulator. Many of these settings (including the important MSAA setting) do not take effect until you restart the simulator.
OpenXR Toolkit
And now we have finally arrived at the end of this guide with just one last thing we need to do. Launch the iRacing simulator again (join a practice session or test drive) and tweak some OpenXR settings via the OpenXR toolkit.
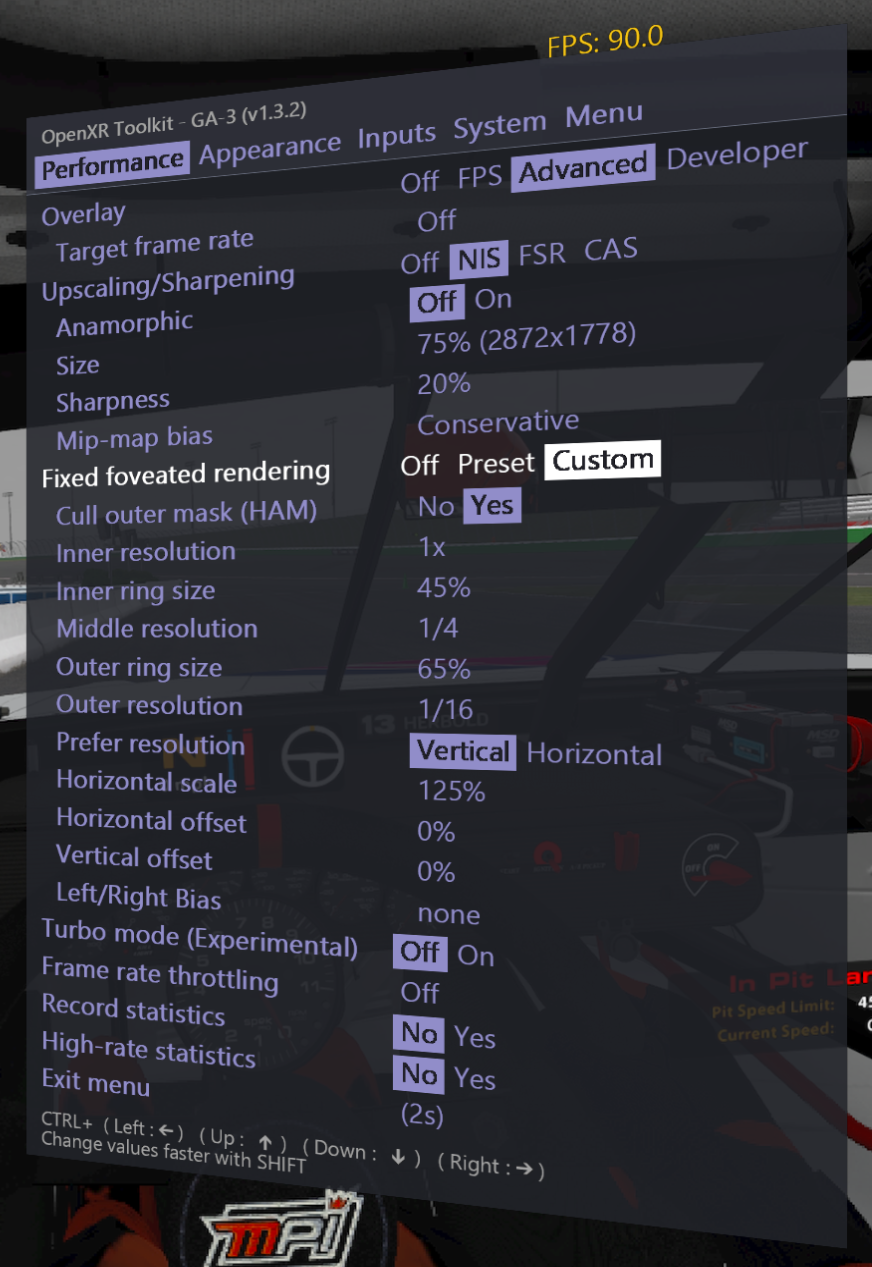 To open up the OpenXR toolkit while in the game, I hit CTRL+Down arrow. This is how I have it configured using the OpenXR Toolkit companion app, your configuration might be different. Once I hit CTRL+Down the OpenXR toolkit window pops up in the game in my VR headset, and there are a few options to set here.
- Overlay = Off
- Upscaling/Sharpening = NIS (OPTIONAL)
- Anamorphic = Off
- Size = 75%
- Sharpness = 20%
- Mip-map bias = Conservative
- Fixed foveated rendering = Custom
- Cull outer mask (HAM) = Yes
- Inner resolution = 1x
- Inner ring size = 45%
- Middle resolution = 1/4
- Outer ring size = 65%
- Outer resolution = 1/16
- Prefer resolution = Vertical
- Horizontal scale = 125%
- Horizontal offset = 0%
- Vertical offset = 0%
- Left/Right Bias = none
- Turbo mode = Off
- Frame rate throttling = Off
- Record statistics = No
The upscaling settings are optional - if you do mostly oval racing in the daytime on dry tracks, you would likely be able to sustain 90 FPS with upscaling turned off. However, if you do race in the rain at night you might need to turn this on to hit 90 FPS.
The foveated rendering settings here are important - these settings produces quite a significant boost to the frame rate with very little hit on quality. The reason the quality does not suffer so much is because we also have MSAA antialiasing turned on which hides some of the shimmering artifacts you would normally see at the edge of your vision. The two ring sizes I have selected - 45% and 65% - are pretty much at the limit of what I can tolerate. You want to set these numbers as low as you can bear. People with eye tracking and DFR should be able to set these numbers a little bit lower than people using FFR.
Turbo mode turned is currently off in my setup, but some people have reported improved frame rates with this turned on for iRacing. You can try turning this on, but be aware that this is an experimental feature of the OpenXR toolkit. If you experience issues such as the game crashing then turn turbo mode off.
Then on the next screen, we have the appearance settings. This screen is completely optional - on this screen I have post-processing turned on and the vibrance setting turned up to around 75 to make colors pop a little bit more.
And… you're done!
Still Not 90 FPS?
If your hardware set up is similar to mine, you should be racing at 90 FPS consistently on most tracks.
 To verify this, you can bring up the OpenXR toolkit inside the iRacing simulator and change this setting -
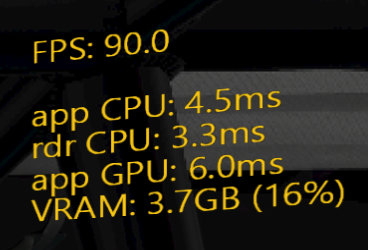
- Overlay = Advanced
This will tell the OpenXR toolkit to draw the current frame rate and the CPU and GPU utilization numbers on the screen. There are some settings under the “Menu” tab that will allow you to move this overlay around on the screen. To the right is an example of what this will look like on your screen. Here is an explanation of the numbers you see in this overlay -
- FPS - This is the current frame rate and the goal is 90
- app CPU - This is how much CPU time the application (the iRacing simulator) is using for other things (game logic, physics, and so on)
- rdr CPU - This is how much rendering thread CPU time the application and graphics drivers are using to draw each frame
- app GPU - This is how much GPU time your video card is using to draw each frame
Our goal is to keep the “app GPU” number below 11 milliseconds. One second divided by 90 frames is 0.01111 seconds per frame, which is the same as 11.1 milliseconds per frame. If you are below 11 for the “app GPU” number and your frame rate is not 90 FPS, then the iRacing simulator is likely CPU bound on your computer. Being CPU bound means that your CPU is the limiting factor, and trying to optimize the graphics settings would result in little to no improvement to the frame rate.
If you're not quite getting below 11 milliseconds for the “app GPU” number, there are a few options you can ease back on, to help you get there as long as you are not CPU bound. Try them in the order listed:
- Use “normal” instead of “large” for field of view in the Pimax Client settings (try this first)
- iRacing graphics settings
- Event = Low Detail or Off
- Objects = Low Detail
- Pit Objects = Low Detail
- Cars = Medium Detail
- iRacing graphics settings
- MSAA Samples = 2x (last resort)
As a last resort you'll need to change MSAA Samples to 2x instead of 4x. Don't forget to restart the iRacing simulator if you do that.
Tracks Tested
Here are some tracks that I've tested these settings with so far, and the resulting frame rate. These were tested with all of the recommended options without resorting to doing any of the things listed in the above “Still Not 90 FPS?” section. This list will grow slowly over time.
| Event | Track | Version | # Cars | Rain | Grid FPS | Race FPS |
|---|---|---|---|---|---|---|
| Pickup Cup | Daytona International Speedway | Oval - 2008 | 24 | 90+ | 90+ | |
| Carburetor Cup | Auto Club Speedway | Oval | 13 | 90+ | 90+ | |
| Rain Master - Fixed | WeatherTech Raceway | Full Course | 15 | Yes | 80+ | 90+ |
Videos
Here is a video of a Rain Master event at WeatherTech Raceway with 15 cars and rain. When at the grid the frame rate does go down to around 80 FPS because my CPU isn't fast enough to feed the GPU beast. As the race progresses, the frame rate climbs to 90+ and stays there consistently. This video was taken with upscaling (NIS) turned on in the OpenXR Toolkit settings, and was recorded at 1080P @ 60 FPS. The recording shows only a small 1920×1080 region of the full 4K left eye image.